NVIDIA GPU Overclocking
Guide for tuning NVIDIA GPUs with MSI Afterburner, focusing on core clock, undervolting, and memory overclocking.
Overclocking raises clock speed and usually increases temperature. Undervolting caps voltage so the GPU can run with lower wattage and temperature while keeping useful performance.
Recommended order
- Install monitoring and tuning tools.
- Configure MSI Afterburner, fan curve, and power limits.
- Set up benchmark and stress tools.
- Find a stable core clock and voltage.
- Undervolt if thermals or power limits are the bottleneck.
- Tune memory after core settings are stable.
- Run final validation.
Before you start
Install HWiNFO and run it in sensors only mode during stress tests.
This guide skips VBIOS flashing. If you still want to try it, use the correct VBIOS and follow a dedicated flashing guide first.
During tuning, watch the performance limit in HWiNFO. It should not stay at Yes all the time.
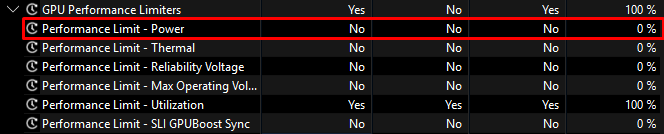
Power limit
If the card constantly hits the power limit, it downclocks. Raising clock alone will not help until voltage and power headroom are under control.
Tools to install
| Tool | Role in this guide |
|---|---|
| MSI Afterburner | Fan curve, voltage curve, power limits, and profiles |
| Superposition | Core and VRAM stress during tuning |
| 3DMark | Additional benchmark runs while finding core clock |
| OCCT | Error checking after OC/UV is complete |
| memtest vulkan | Final VRAM stability pass |
| FurMark | Optional heavy power test at the end |
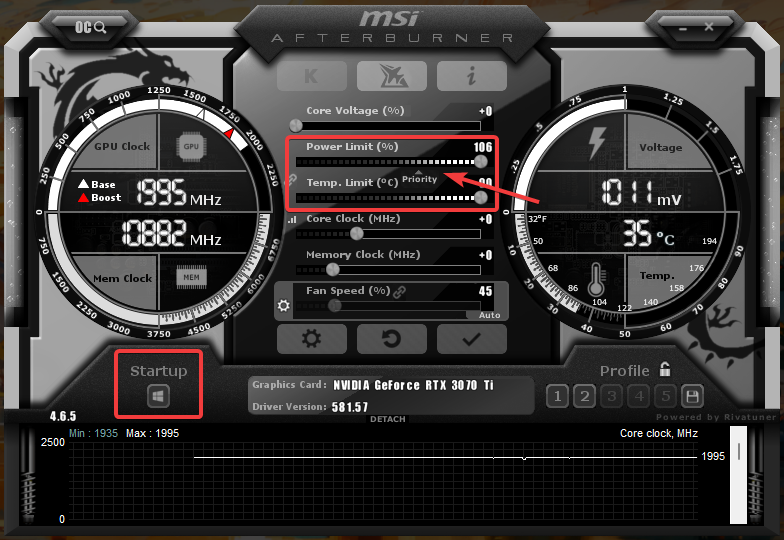
MSI Afterburner setup
Fan curve
Set a custom fan curve and keep fan speed high enough that thermals do not skew your results. You can import the preconfigured cfg file or configure it manually.
Load a profile at startup
If you do not want MSI Afterburner running in the background all the time, set a static curve and load a profile at startup:
schtasks /create /sc ONSTART /tn "MSIAfterburnerProfile" /tr "powershell.exe -NoProfile -Command \"Set-Location 'C:\Program Files (x86)\MSI Afterburner'; .\MSIAfterburner.exe /profile1\"" /rl HIGHEST /delay 0000:20| Parameter | Description |
|---|---|
/sc | Schedule type. ONSTART runs the task every time the system starts. |
/tn | Task name. Each scheduled task must have a unique name. |
/tr | Program or command to run. Use the full path to the executable. |
/rl | Run level. HIGHEST runs with elevated privileges. |
/delay | Wait time after trigger in mmmm:ss format. |
See schtasks create for the full parameter list.
Power and temperature limits
Set Power Limit and Temp. Limit to their maximum values, change priority to power limit, and disable automatic startup for now so a bad profile does not loop on launch.
Benchmark and stress settings
3DMark
Use Time Spy and Steel Nomad. Avoid Wildlife, Solar Bay, and light versions.
Superposition
Use the highest preset that does not exceed your VRAM limit to test core clock. Use 8K or 4K Optimized to stress VRAM.
OCCT
Open the 3D Adaptive tab and use these settings:
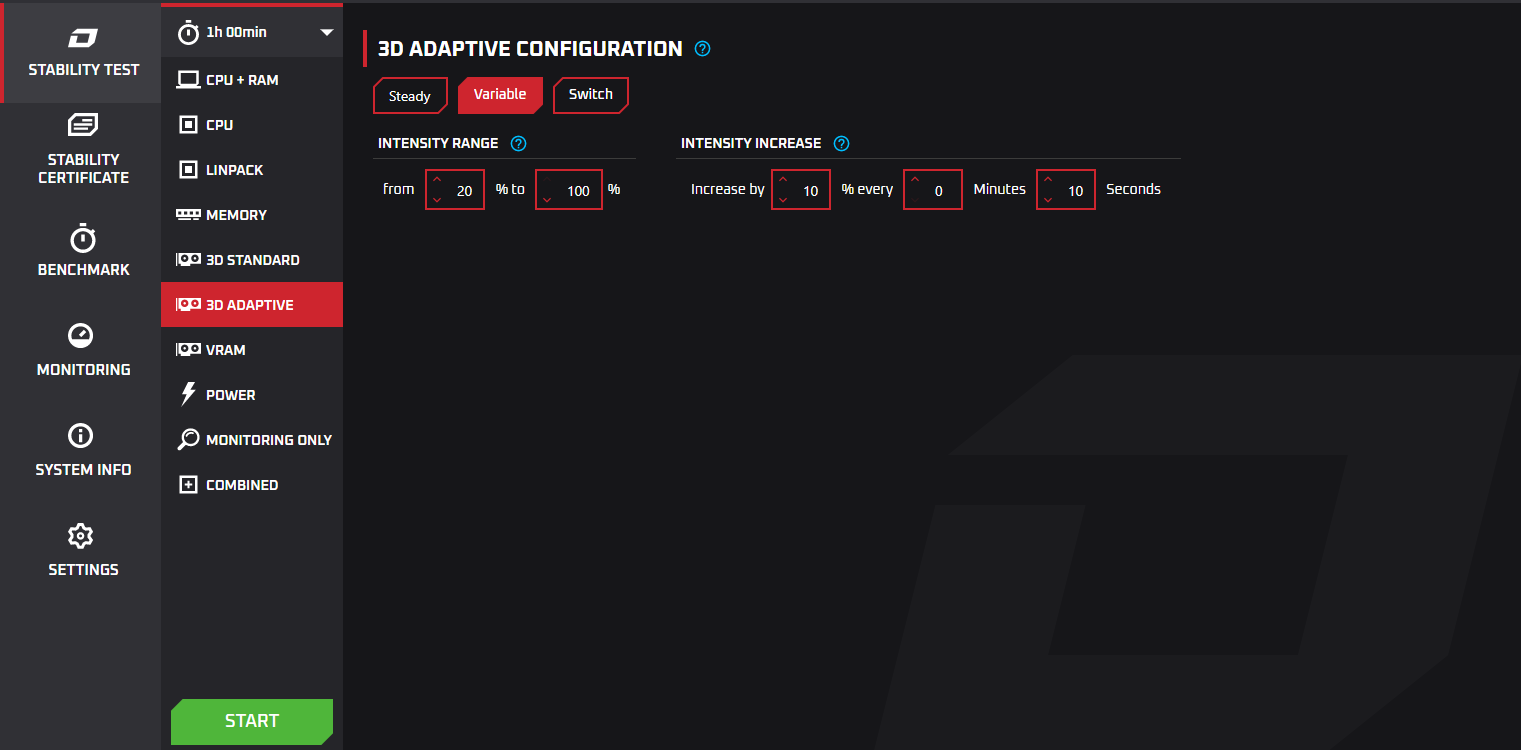
When to use OCCT
Use OCCT after core and memory tuning are done. Avoid it while searching for voltage, because it often pushes the card into throttling.
Core overclocking
Find a voltage and clock combination that does not constantly hit the performance limit, downclock, or crash.
- If a stress test crashes at
+180@1025 mV,+180is unlikely to be stable at a very different voltage. - Use multiple stress tests and run each for about
30 min, not just a few seconds. - Core clock and effective clock should stay close together.
| Architecture | Step size | Examples |
|---|---|---|
| Kepler, Maxwell, Pascal | 12.5 MHz | GTX 600/700/900, GTX 10 Series, Titan cards |
| Turing, Ampere, Ada Lovelace | 15 MHz | RTX 20/30/40/50 Series |
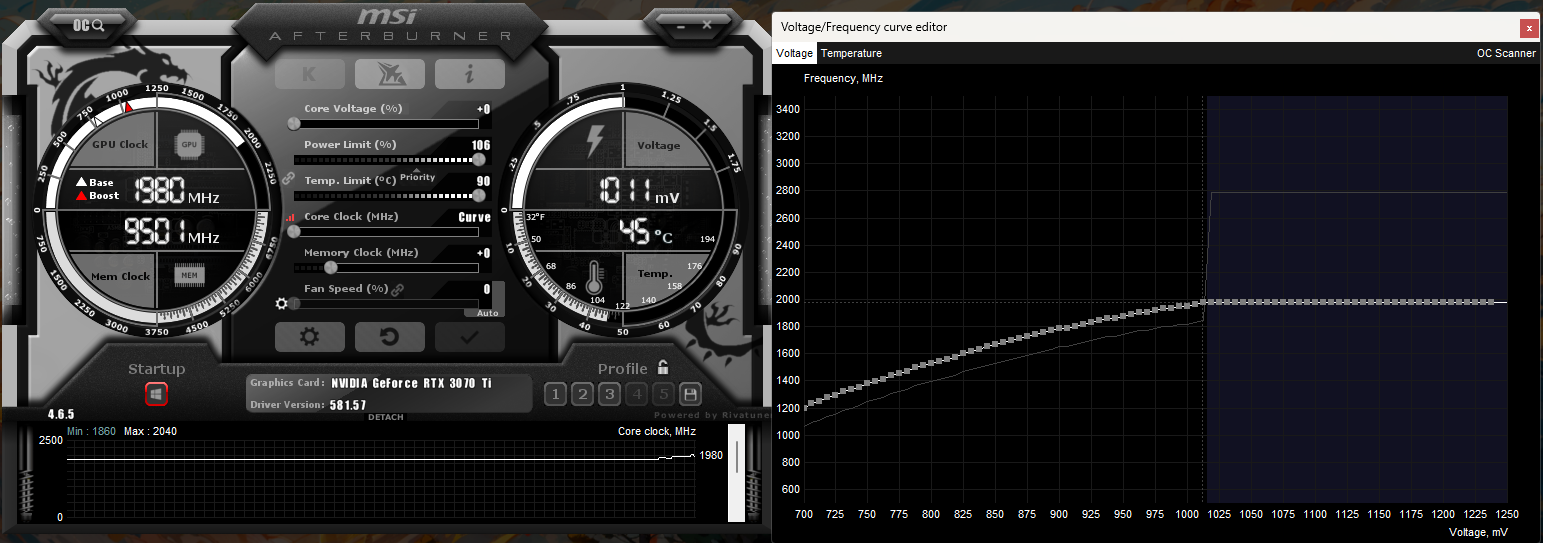
Core clock and voltage
- Start at
900–950 mVwith+50 MHzto+75 MHzcore offset and run Superposition or 3DMark once. - Watch temperatures in HWiNFO during the run. The GPU should warm up above
75°Cfor a meaningful test. If you are already near~85°C, skip overclocking and undervolt instead. - If the run finishes cleanly, increase core clock by
15 MHzor12.5 MHzand test again. You can also raise voltage if you are not hitting the power limit yet. - Repeat until one of these happens:
- Crashes: lower core clock.
- Power limit: lower voltage.
- You should end with a voltage and core clock that pass stress tests without constant crashes or power-limit downclocking.
Example result:
Undervolting
Undervolting limits GPU voltage so wattage and temperature drop while keeping usable performance. Use it when thermals or power limits stop you from holding a useful core clock.
Limit the voltage curve
- Open the curve editor (
Ctrl+F). - Click the next point to the right of the millivolt value you want, for example
906if you want900 mV. - Hold
Ctrland select the curve from the right up to that point. - Drag the selected point down so the last point ends below the first point, for example
900 mV.
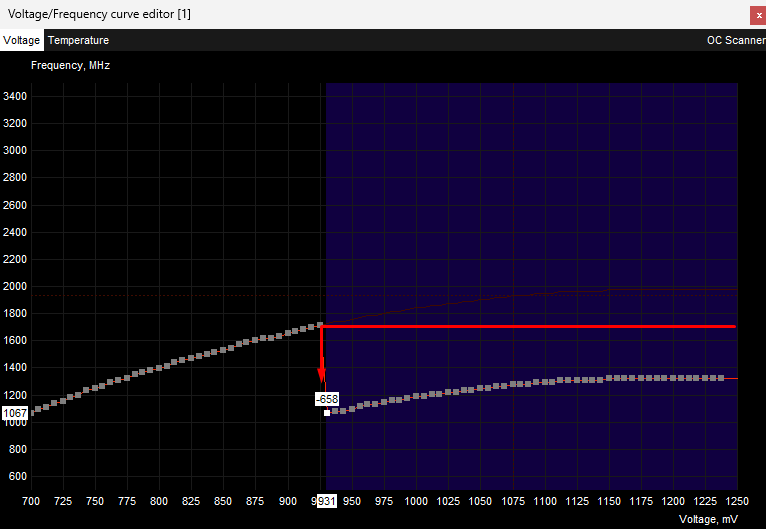
- Save the settings to a profile.
Use the same curve-editor steps during core tuning whenever you need to cap voltage at a specific millivolt value.
Memory overclock
Use a stable core clock first. Save benchmark results before tuning memory, because you will often stop when scores get worse even if the card does not crash.
Watch for artifacts such as flickering textures, colored pixels, or screen tearing. Most cards can take a large memory offset, so you can start around 250–500 MHz.
Increase the memory clock
- Enter your starting memory clock.
- Stress test with Superposition.
- If stable, increase memory clock by
100 MHz. - Repeat until scores drop, artifacts appear, or the run crashes.
- Go back to the last stable value and add
50 MHz.- Stress test again. If stable, increase by
5–10 MHz. If not, drop50 MHzand tune up in5–10 MHzsteps.
- Stress test again. If stable, increase by
- Save the stable memory clock to a profile.
- Validate VRAM with memtest vulkan for about
30–60 min.
Final validation
Run these checks after core, undervolt, and memory settings are saved: